Climbing out of the pit . . .

Well, I fell off the wagon.  I had every intention of making the projects and cooking the recipes that I had pinned up to the first of the year . . . sadly, instead, I continued pinning.  Just from my pinning this morning I had almost 100 people either like or repin my stuff . . . and I picked up 6 followers just today.  The pressure!

Wow, we had a great New Years Eve! Jake brought home a 1000 piece puzzle from work which we have worked on for 3 days now, the predominate colours are the blue sky and the white snow . . . but it is now complete. Then we had a game of Taboo while waiting for Jake’s friend Forrest to arrive and start a great game of Balderdash. Everyone had a great time and I got the Clementine candle to work, finally! It really was quite pretty once the flame took hold.

On New Years day I made Red Velvet pancakes for brunch, they were really delicious. The original recipe was quite thick, so I added a bit more buttermilk to thin it out and that worked very well. They are very rich with a strong chocolate flavour and oddly have a sort of coffee scent. I will be making these again in the future.

Now that February is half over, I am back to the blogging and I will tell you about the recipe that I supervised Zach and Heather cooking.  Although they really didn’t need my help, they are a great team.

The Sweet Potato Ravioli was incredible!  While we ate dinner, we discussed alternate fillings and how to attempt to freeze the ravioli.  It was a huge hit!

We gathered ingredients and set to work.

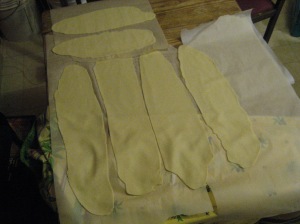
Making the pasta was an adventure, Zach and Heather took turns kneading it until it was smooth enough to go through the pasta machine to flatten it out.

We ran it through the pasta roller on settings 1-4 increasing the setting with each pass.  We ended up with 6 pieces of wide pasta of matching lengths.

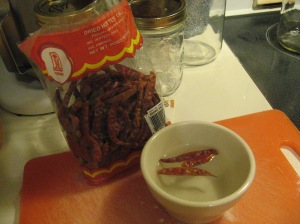
I could not find fresh hot peppers, in Quebec they are really difficult to find especially in the middle of winter so I used some Dried Hot Thai Chili peppers I had in the cupboard, we soaked them in boiling water for a bit until they rehydrated and then seeded and chopped them.

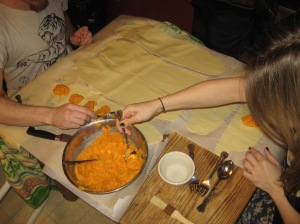
Since we weren’t roasting the peppers with the sweet potatoes, we microwaved the potatoes, then peeled them and used a potato ricer.

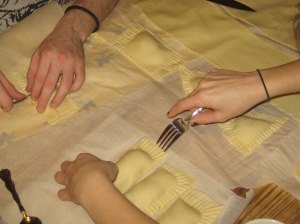
Heather and Zach worked together on filling, cutting and sealing the ravioli’s.  They put the filling in, leaving enough space between each portion to cut and seal the ravioli, then using a pastry brush painted the pasta with water, placed the matching pasta sheet on top, cut and sealed each portion.

They placed the ravioli in boiling salted water in batches, removed and sautéed in olive oil.  I had some sage that I had dried from last summer that I fried in some additional olive oil then added a bit of white wine, let it reduce and spooned it over the ravioli!  Viola!!

Some of our ideas for fillings included, portabella mushroom, shallot and heirloom tomato; pumpkin, coconut milk and sage; spinach and artichoke; you could use almost any seasonal produce to create some really great pasta dishes.  We are going to attempt to freeze the ravioli next time and see how that goes.  It would be nice to make these in large batches and freeze it, it would be an impressive main for a dinner party or date night.

Merry Christmas!!

Wow, by Christmas morning, I had 3 more items done from my Projects board and 1 from my Recipe board completed.  How did they turn out you ask?  Well . . . The bow instructions I found at this website

http://www.save-on-crafts.com/howtomakebows.html

did not turn out as well as I had hoped.  Maybe I didn’t read through all the directions and tips or perhaps it doesn’t tell you on their site (I checked and did not find a mention), you need to use ribbon that has the same print or colour on both sides.  I bought a ribbon that was white with a silver design on one side, when I followed the directions my bow would have been white with no design because the majority of the silver was now on the underside.  Ok, I simply turned the ribbon over and tried again, the results were still awful as my frustration level started going up, I decided that I would make a different sort of bow to finish up what I was doing and buy different ribbon later to try these directions.  Here is what I ended up with.

The Clementine Candle is very cool and as we had a crate of Clementines in the house for Christmas I asked my husband to watch the video and peel the next one by those directions.  He did and the peel came off in two sections

http://pinterest.com/pin/211458144973505967/


Sadly, the part that was to be the wick of the candle was quite short, but we added the olive oil anyway.  I let it soak for about 10 minutes and tried to light the “wick” not happening, so I continued to let it soak . . . an hour later I got the wick to light, YEA!!  However, because it was a short wick, it did not stay lit.  I will try this one again in the next few days as I still have tons of clementines in the house.  The video instructions are quite good although it doesn’t tell you how long to let the oil soak, I would make these early and let the oil soak for at least half an hour before attempting to light and use them.

We were invited to a friends home for dinner at the last minute and realized that we didn’t have any gifts for their kids and only a bottle of wine for them, didn’t seem too festive.  So, I went to Pinterest and found a link to this website

http://www.the36thavenue.com/2011/11/25-handmade-gifts-under-5.html

I looked through the list and chose items number 12 and 13.  I made up the Oatmeal chocolate chip bread quickly, cut and pasted the baking directions into a word doc, printed and asked my daughter Jake to make the front look festive!

She did a great job!  I placed the jar in some holiday bags I had, tied on the card and a mini disco ball and there you have it.  I also made a batch of Ylang Ylang bath salts and put those into jars for their daughters and the two exchange students staying with the family, same bags and disco ball decoration and we were set to go.

While looking over the list, I noticed the bath soak and thought I had the ingredients all on hand and made a jar of those too!  I chose an herbal peach ginger tea that I had and know smells really nice, I think it fits with the other items in my bath and body basket!

I hate to waste too much time on Christmas morning cooking breakfast so traditionally I have made a Monte Cristo casserole, I put it together before I go to bed Christmas Eve, put it in the fridge and it bakes while we open gifts!!  Quick and easy, this year I found this lovely recipe for French Toast Souffle

http://tomatoesonthevine-velva.blogspot.com/2011/01/french-toast-souffle.html

I went to my local bakery early in the day on Christmas eve and bought the day old croissants which I cut into large pieces and put those in a pan to dry out a bit more.  Before I went to bed I mixed up the cream cheese mixture, poured it over the bread, covered it and into the fridge it went.  I checked it first thing Christmas morning and noticed that the bread on top was not soaked in the egg mixture so I gave it a quick stir and let it soak a bit longer while I waited for the rest of the house to stir.  Once they were all awake, we opened our gifts while the Souffle cooked and then had a great breakfast, it was absolutely delicious!  What a great Christmas morning, made even better with my obsession even with the two fails!!!  Hopefully I will have time to work on some other projects or recipes from my Pinterest boards this week but with the kids here, tonight’s Chinese dinner and a catering job later this week, we will see!


Body scrubs and Bath salts, oh my!

I began to find many really nice recipes for bath and body products and then started scouring the web for more.  I have found more body scrub recipes, bath bombs, bath fizzies, lip gloss and bath salts than you can shake a stick at.  So far I have made Lemon Hand Scrub and Brown Sugar Almond body scrub but have the ingredients to make several bath salts and homemade liquid soap!  Today I am going to make more Lemon Hand Scrub and maybe more Brown Sugar Almond body scrub.

I made enough for my Christmas list but one of my catering clients asked to buy 3 of each for her staff`s Christmas gifts.  They were very well received and everyone was happy . . . except for me because now I have to make more!!!  Like any other Pinterest advocate, I went out and found some awesome metal buckets left over from the summer at my local dollar store, some pretty shredded filler, wired ribbon and various ornaments (including mini disco balls!!!) that I will use to tie onto the handles, fill with the bath products and Viola!  Christmas gifts!

Yes, as you can tell, I am losing my mind with this stuff.  I have to cater 2 dinner parties this week plus my normal personal chef clients along with my own family Christmas Eve and Christmas day dinners . . . oh yeah and we have our annual Boxing Day Chinese dinner to cook too.  Here I am making body scrub and decorating pails . . . I should be Facebooking or texting my friends like normal people, but no, I am obsessed with my Pinterest project board today and can only focus on completing what I have pinned so far before I go out and look for more websites!

So, the Lemon Hand Scrub I found at this site

http://www.bystephanielynn.com/2010/05/lemon-sugar-hand-scrub-for-mom.html

I found that the original recipe was a little too oily for me so I added more sugar until I liked the consistency.  I also wanted a more lemony product so I added some lemon zest and lemon extract it really smells yummy!  My daughter Jake (the smart mouthed one . . .oh yeah, both girls are that way but she is the one who made the Mason jar and burlap comment) is a handwasher and hates the film the olive oil leaves behind, I really like it though.  I have used my own scrub after making pastry and it gets all the gook off my hands easily and also looks pretty sitting beside my sink!

The Brown Sugar Almond body scrub was the opposite of the Lemon Hand scrub, I found it too dry . . . so I added some olive oil and it`s just lovely.  I have used it twice now and after my shower my skin feels so soft and the olive oil really helps keep the moisture in my skin.  I found the recipe at this site

http://radmegan.blogspot.com/2011/01/soothe-winter-skin-with-this-homemade.html

At this point, my kitchen counters are covered in sugar, oil and extract and I am trying to clean up.  Instead, I use my handy hot glue gun to glue the lids to the rings for my mason jar containers and then decorate them with pretty ribbons.  I printed some labels stuck them on the jars and there you have it!

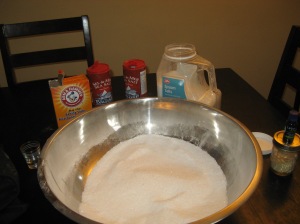
Once I finished up the scrubs, I got out the ingredients to make the bath salts.  There is a product at Bath and Body works that has an orange ginger scent that I adore, I have used the soap and body lotion for years so I decided to make orange ginger bath salts.  I got the basic recipe from this site

http://candleandsoap.about.com/od/bathbody/ss/basicbathsalts.htm

I doubled the salt mixture amounts and I added ground ginger and orange essential oil until I thought it smelled right.

After letting it sit for about an hour, I put the salts into the jars then got out my hot glue gun to decorate the lids.

I know this is only the second post, but really I am not feeling better about my addiction, as a matter of fact, last night I really wanted to go on Pinterest and find some new projects or surf the web for more interesting crafting sites. . . crap, I so should have done some surfing, I got 2 new followers this morning for my Project board, oh well, they will have to wait until after Christmas to be entertained.

Pinterest is the devil

My son Zach’s girlfriend Heather introduced me to the devil about 3 weeks ago . . . Pinterest.  She told me that she had become an overnight addict and didn’t want to stay up late at night “pinning” by herself since she knew that I was a night owl, she was certain, I too would be up all night “pinning”.  After signing up, I spent 5 hours communing with my inner Martha Stewart.  The second day I had pinned enough Projects and Recipes that I gained my own followers.  Not wanting to disappoint said followers, I began to spend time everyday sourcing out new and interesting blogs and websites to entertain them.  By the second week of my descent, I began to make shopping list of items I needed to complete these projects and began making lists of timelines and project goals.  Then the madness really began, I started making sugar body scrubs and lemon hand scrubs, bath fizzies and liquid soaps . . . I started looking at candle making tools, I got out my old pottery kit and carved monograms into bars of soap . . .

This blog is my therapy, I spent 12 days making things and then decided that I would start photographing the steps and blogging my progress on the many, many projects and recipes that I am pinning to my Pinterest boards.  I haven’t searched the web yet to find out how many others are doing this same therapy, but I hope that it will assist me before I turn completely to the dark side . . . my inner Martha Stewart becoming more and more apparent to my friends and family would really scare them!!  I hope the tales of my descent into crafting and cooking madness will help others to find their own inner Martha Stewart and hopefully make you laugh at my folly.  My daughter tells me that soon everything in our home will be made from mason jars, burlap or buttons . . .

The first Pinterest item I tried was homemade Egg McMuffins from this site

http://www.macheesmo.com/2010/03/breakfast-sandwiches/


I used silicon muffin cups so didn’t use the Pam spray or other oils, the eggs slip easily from the cups.

My family prefers that I break the yolks up a bit so I jab them with a fork and stir a bit before I bake them

I make 6 to 12 at a time and keep them in the freezer, my family loves it.

Normally we pop them into the toaster over, turn on the coffee maker and hit the showers, by the time we are dressed and ready for breakfast the coffee and the Egg McMuffins are ready and we can go on with our day.  I did find that using a baking sheet with sides seems to leave some moisture in them but if you use a cookie sheet in the oven or place them directly on the rack of the toaster over they come out perfect!  Actually, this item I found on Pinterest is not so bad after all!!!